Showing posts with label Watering. Show all posts

Wednesday, 3 February 2010

SINK AND WALL GARDENS

A lot of vegetable gardening authorities, whatever that means, suggest planting vegetables on raised beds but in South Australia and a lot of other Mediterranean zones, this, to me is madness. In places where summer water is oh so precious, we do not need to provide drainage, we need to be preserving every drop of water for the plants. If you look at raised garden beds, you often find the paths, which are lower than the beds, grow lush crops of weeds and grasses!

Jude Fanton has found these beautiful gardens in the arid zone of western Rajasthan, India, which show what can be achieved when we look at our own environments and not those of people on gardening shows in other climates, even in the same country as ourselves.

I don't know if you remember my terracotta pots idea, but it comes from looking at my own situation and works wonderfully well in doing several things to help plants get through our extreme summer heat.

First, unsealed, unglazed terracotta is simply fired clay and is porous so the water moves very slowly out through the pot into the soil, keeping plants such as lettuce and bush beans turgid and fresh even in the full sun on days over 40C.

Secondly and probably equally as important, the water in the clay pot, covered with a tile, keeps the surrounding soil temperature from rising too high. It is high soil temperatures which damages the roots of plants and causes them to burn off, in extreme heat, and stop the roots sucking up water even if it is available.

For more on this experiment see these updates:

 http://hillsandplainsseedsavers.blogspot.com/2008/02/do-you-know-what-didnt-droop-today.html

Kate and the Beanstalk

Using tank water without a pump

Olives and Artichokes

Recently I experimented with another similar idea, where I put an open, plastic bowl full of water in the middle of a large, shallow tyre-pot and surrounded it with tiny, caterpillar-eaten bok choy seedlings. I could not believe the speed of their growth compared to seedlings I planted elsewhere and they were ready to eat in 21 days! I am not sure why it worked, maybe the water heated during the day and kept the soil temperature warmer over night..... maybe it was the humidity provided by the water..... maybe both.

Friday, 8 January 2010

PINK

I have never really thought of myself as a lover of things pink; preferring instead what I call autumn colours. I have no pink clothes and even if I had girls, I am sure I would never have dressed them in pink either. How is it then that my garden seems to be turning pink?

image Amaranthus....
Currently my favourite summer-growing vegetable. Eat the new, pink tinged leaves in salads, cook older ones, scandalously flamboyant flower tassles and stems, nutritious seeds for humans and chooks, self sows readily, water efficient, gorgeous to look at, 1.5m high.
image
image
image
Pink Hollyhock.... always a surprise.
Pops up anywhere. Drought tolerant. Tall and elegant. Also have crimson ones and white ones. Flowers for months with carefree abandon. Can grow as tall as the roof!
image 
One plants whose name I can never remember but which covers an arch in a single bound and would be able to leap tall buildings too. Masses of soft pink flowers with very little water needed. Deciduous. Spectacular.
image
Tropical canna lily. Needs water. Colours range from pink to orange, yellow, red, lime to dark greens. Spikes of bright red flowers. Who designed this plant to have leaves like this??
image
Fuschia.... oh to be clever enough to grow the dainty, frilly ones!
image 
This graduated pink salvia with flowers resembling little animals smiles all through the heat.
image 
I love hydrangeas with their showy heads but I prefer the white ones. This is almost the last surviving one given to me by my father about 18 years ago.
image 
My absolutely favourite plant.... the spotted leafed begonia with fine webs of pink flowers connected in intricate patterns. Needs shade, not too much water and a frame. I forgive it for being pink!
image
image 
Even the string tying up the bales of pea straw is pink these days! Here it is being used on an old fence.
image 
My favourite beetroot has deep pink leaves and stems and the leaves are great to liven up a green salad. This is a tiny seedling I planted out just yesterday.

Wednesday, 6 January 2010

STURT DESERT PEA, SOUTH AUSTRALIA'S FLORAL EMBLEM

image

Why aren't we South Australians all growing this stunning plant? Sturt's Desert Pea (Swainsona formosa) requires absolutely no water after germination and the seeds remain viable for hundreds of years! Seeds are available, evidently, from State Flora in Belair National Park.

Its one need is very good drainage and preferably sand. These are photos of when I grew it in the summer of 2007, in a very sandy patch of soil that the previous house owners must have used to backfill behind a retaining wall. They grew to be about 60cm wide and high. If your children have grown out of their sandpit, fill it with these!

image


As you can see at the bottom of this second photo, in the middle, it is a true pea and forms pea pods. The "eyes" of the flowers go from red to black as they mature and each spray forms a circle around the stem. I have no idea why I didn't collect the seeds or if I did, what happened to them but I am going to try growing them again. I don't know when to sow them, but I will find out! 


If you want to do the permaculture thing and make sure everything you plant has 3 or more uses, then here is one such plant for all South Australians..... they will attract native birds to be your pest controllers, they require no extra watering, they must be one of the most mesmerisingly vibrant plants in the whole plant kingdom and they are all our's!

image


Here is a shot of them growing in their natural habitat, courtesy of aaardvaark and flickr.

Thursday, 5 February 2009

How cool is this?


Larry Gilg is very fit and has an effective sprinkler system for his garden. He's also made a large rainwater tank by connecting several small pickle barrels. Have a read:
http://www.harvesth2o.com/pedaling.shtml
(If the link doesn't work, try clicking on the title of this post. If that doesn't work either, copy the address and post it into your address bar.)

Monday, 8 December 2008

TERRACOTTA WATERING POTS AND WATER SPINACH UPDATES

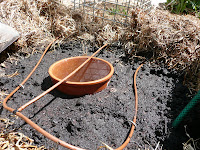
image Gavin from The Greening of Gavin, has installed a few of these himself recently and most of mine are now in operation too.image I did as Chaiselongue from Olives and Artichokes did too, and put a tile on top. My plan is to put a single dripper into each , all joined by thin black poly pipe, so they will fill twice weekly, automatically. When it is very hot I can also fill them with the hose any time, since they are a receptacle ......how ridiculous.....but if you can't beat them, use their silly rules to your advantage!...Or do both.

Around each pot I have sown 6 bush beans quite near the pot rims and then further out I have planted out the various chicory seedlings Deb gave me. Since I took these photos the beans have started to come up and  I have also mulched the area with straw.... not everybody's ideal mulch but I have used all my own mulch already and I like straw because its light colour reflects the mid-summer heat.


image

image

Also this week, the water spinach or kang kong, has grown enough good, strong roots in a vase to begin growing quite a lot of leaves. Notice how its roots and stems now go right to the bottom of the vase (photo at right) and the leaves are growing tall and straight. 


Now it is time to pot them up and put them out into the tubs of water which I will slowly fill as the plants grow.Eventually, the stems and leaves will fall over and float on the water surface, sending down more roots from some of the leaf nodes.


Evidently kang kong is related to sweet potato and both of these I saw growing prolifically in Wilson's community garden in Singapore. I have been unable to get any of my 3 sweet potatoes to sprout yet this year....they just stay persistently and stubbornly uninterested in reproducing themselves. My plan was to grow them as a living mulch under the capsicums, and harvest the leaves regularly for salads since the leaves are delicious and far easier to grow than the tubers and are something you can't buy at the markets.

Tuesday, 18 November 2008

PREPARING FOR SUMMER

It is worth going to some trouble now to help reduce evaporation, keep the soil from overheating and maintain soil moisture around the root zones, during the heat of summer. We have had a week or so of beautiful, cool weather which has been ideal for getting these jobs seen to so and to avoid working in the hot summer sun, battling against the elements. Working with nature is always the best option because you will never beat or control the forces of the earth.

I fork over the soil, lightly dig in some compost and whatever else you like to use. This year I am also adding some reconstituted coconut fibre blocks that are $1 each at Cheap as Chips! They help to hold the water in the soil and are a better option than those granules or other chemical solutions.....and MUCH cheaper. On this whole bed, I used 1 block, reconstituted in about 1/2 bucket of water, or maybe a bit more.....try it and see. I hate buying inputs but I am preparing for extreme, prolonged heat.

Then I have laid out the dripline. I hate the dripper and much prefer small sprays but this is my front yard.....and people walk by all the time so I have to obey at least this part of the water restrictions. Large plants like capsicums, tomatoes, eggplant and okra are fine with drippers. There are 4 rows of dripline and I will plant between the rows, so there will be 3 rows of vegetables. Over each dripline I place about 3 sheets of newspaper folded into thirds, so that's a thickness of about 9 sheets.....thanks to Joy for the newspapers......I have discovered in the past that this does a great job of keeping all the water going down, into the soil. Then I  lay thick 'biscuits' of straw over the top.....if I thought we were likely to get any substantial rain, I would fluff up the straw, so the rain would penetrate.....but it seems unlikely that there will be any rain, ever!

So, now there are 3 channels, between the 4 rows of straw, and into these I will plant the seedlings. They will need watering until their roots reach out to the moisture from the dripline. This method ensures that the roots will congregate in the coolest, wettest, most mulched areas, and there will be a little space around the plants for airflow. This is very hard to photograph...it just all looks like a mass of straw....I hope you get the gist of what I am describing here!

image image image


Another thing I am developing is my water vegetable garden.....4 tubs will all soon be full of various, mostly Asian vegetables like water chestnuts, water spinach (kang kong), taro, water cress, duck potato and nardoo. I also have a few water irises which have been spectacular in the last week or so.

image
The water chestnuts are doing very well this year..
image
..3 of the 4 tubs installed..
image 
..A photo for Chook of the whole scene!


The water can get very hot on a 40 degree day so I surround all the sides with straw for insulation and fill the tubs completely and also use some non-invasive creeper to cover the water surface. If I think mozzies are a problem, I get a few of those tiny native fish, that don't eat frog eggs, because there are lots of frog noises coming from this area already! Ideally I would like to have light-coloured tubs but beggars can't be choosers!image


I erected this floppy bit of shade for the new seedlings but I want to make something more like in Scarecrow's garden. In addition to the white shade top, I am going to put some light weldmesh along the sides and grow beans. By the time it is mid-summer, the beans will be providing extra shade along the sides of my curving garden beds, which are more difficult to shade than if they were in nice, straight lines! Under these more substantial structures I will grow softer things like lettuce and cucumbers.


In the full sun, in another bed which always seems to be drier than anywhere else, I am going to put the terracotta pots, with bush beans and celery around them as they do best with more water. So, better late than never and this cool weather is letting me get these jobs done, while listening to the wildlife.....shame snakes don't make a noise though!

Wednesday, 12 November 2008

EARWIGS, POROUS TERRACOTTA POTS AND OTHER STUFF....

Multiguard1kgLots of people the world over, it seems, are having problems with earwigs...Hugh even has them in his wardrobe! Gavin, from The Greening of Gavin, has found a solution that works. You can read about it here. I saw Gavin's little jars of oil and yes, they were full of earwigs.....and he had only cleaned them out the day before.

I sometimes do a similar thing with Multiguard  snail bait. I know Multiguard is supposed to be only made from iron and this is what kills the slugs, snails and millipedes but I am always cautious about "products" so I put the pellets in glass or plastic containers, lying on their sides, under something like broccoli plants. The snails crawl in, eat and die. The rain doesn't get in....well, it wouldn't, if we had any, and the dripper line runs alongside. I just empty it every now and then and anyway I only use Multiguard when the seedlings are first planted out to give them a chance to get established. Strong, healthy plants are not troubled too much by insects, unless things get out of balance.

image Today is hot...already over 30C at 10am.....time for the terracotta pot treatment. I wrote here about the experiment I did last year when we had that heatwave, where I sealed up the hole in the bottom of some terracotta pots, put them into the ground up to their necks and filled them with water, then put on a lid and let the water soak out into the soil. I planted lettuce seedlings around some pots and celery and beans around another. This kept 5 lettuce plants growing happily through the heatwave and I even went out and could pick leaves in the hottest part of the day, and they were crisp......amazing. The beans grew fast and strong and the celery was the best I have ever grown and is only going to seed now..... 6 months of eating the stems piece by piece...that's pretty good!

So, when we get a cool change I am going to prepare my next garden bed with a terracotta pot every couple of feet or so and plant out the softest vegetables close in around the post and things with bigger root systems I will put a little further out, so there will be 2 rings of vegetables around each pot. Cover with something and fill with water and top up every few days. As I do it I will take photos.....of course/ as usual.....comme d'habitude (in French)..... and post them here.

Chaiselongue, from Olives and Artichokes, did it in France and I saw her beans that had survived and produced well in their hot, dry summer and she said next time she would do more of it because, like Gavin's little pots of oil, it is cheap and it works famously and you can't ask for more than that. So when there is next a hard rubbish collection near you, do as I did recently and go hunting for old terracotta pots....chipped and all.....anything will do.

Friday, 28 March 2008

HOW TO RE-WET YOUR DRY SOIL

Or: The Challenge of Growing!

From now on everything starts to come alive in South Australia. Some of the gum trees are coming into flower - such as the blue gums around my place - and I noticed that one wattle - acacia iteaphylla - has buds which are fattening by the day. Even some early correas have their first flowers of the year while others will wait until mid-winter. The fact that all these local, native plants flower and then put out new shoots during autumn and winter is proof enough that we have a unique climate and we must take advantage of every moment to get the most from our food gardens. Soon, maybe even tonight, they say, we will get some real rain and then you will see the botanical world around us smile with joy and soak up those tiny droplets of rain and use them to prepare for the heat of next summer. I say it every year - do as other gardeners in Mediterranean climates all over the world do - go forth and sow now. Unless you have been keeping space aside for sowing into then, like me, you will have a garden full of capsicums and okra and eggplant and beans and so on, so sow into trays or pots for now.

This afternoon I started to prepare the next area for planting out some more of the seedlings I sowed in late January and through February. One dreadful thing is that the soil is so bone dry it has become water-repellent, after so long with water restrictions and the extreme heat. Don't plant into dry soil - it will kill your plants faster than you can blink and, once they are planted or sown you won't be able to work the soil to get it damp. The area I was working on previously had been used for tomatoes but they were a failure and I had removed them months ago and discontinued watering that area.
Here is what I did to wet the soil today: I soaked a 'brick' of coconut fibre in 1/2 bucket of water until it was all reconstituted - use too much water and you end up with a slurry. Then I sprinkled 1/2 of this over an area about 2m by 1m or so and lightly forked it in. (Save the other half for another section ). Then I got the regulation watering can and put the hose in it and, holding it with one hand I watered the whole area for several minutes. Meanwhile I held the fork in the other hand and twisted it over and over as I watered. At first nothing seemed to be happening and the water would not penetrate at all. Slowly though, with the watering and the twisting, eventually it started to work and the texture began to change and the moisture was absorbed. I put down the watering can and had a closer look - it was still completely dry only about 5 or 6" down. So off I went again, watering and twisting (who needs a gym to build up their biceps?) It took me over 1/2 hour to get anywhere near damp enough deep enough to consider putting my gorgeous beetroot, fennel and broccoli seedlings into. If you are not planting into it straight away, cover it to reduce evaporation and to start getting the life back into it.

If you can't manage the fork and the watering can at the same time, work them alternately but do not be tempted to think it will all come good when it rains. It will take too long and all that work in getting those seedlings looking so big and strong will have been wasted. Ideally we wouldn't have to bring in something from so far away, as coconut fibre and you could use Saturaid or some other water-granules but it has been a tough summer and I have never had to do this before. This soil is full of the best home-made compost I had ever made, that I added last spring before the tomatoes, so I am confident it will hold all the rain that falls from now on. If you doubt the wisdom of applying all this water to my vegetable garden in the middle of water restrictions, think about where your food comes from and tell me, with all honesty, that it was grown with less water and food-miles than mine!

Friday, 22 February 2008

KATE AND THE BEANSTALK


I knew you wouldn't believe me when I said that the beans I sowed 7 days ago around the terracotta-water-pot were already 20cm high and the leaves were as big as the palm of my hand so I took a photo. It is hard to see the height, I will have to take another photo later. They have received not one drop of extra water since I poked them into the ground, only that from the porous pot. The snails, or something, are getting to some of the leaves but they are growing so fast I think they will be well out of reach soon.

Thursday, 21 February 2008

THE MANGOES AND MORE TERRACOTTA


Some of my mother's mangoes are nearly ripe - in fact the first one fell off today and I have it at home now to ripen for a couple more days. It filled the car with a heady aroma on the drive home. Something to do with the weather has turned them all a soft shade of red on the sunward side, before turning the usual even orange all over.


Can you believe the size of this one???


Here is a photo of Sandy, her dog, that I take to the beach each week.

Today I found some good sized terracotta pots (for the watering idea) at Big W for $2.98.

They are slightly smaller than the last ones I used but still perfectly fine. Of course you can and should use any old pots but if you don't have any, these are very cheap. When I told my mother about my idea she got very excited and is going to get right onto it tomorrow, with some pots she has in the shed. It is hard for her to keep small things going, especially seedlings, and I think this will help greatly. Just being able to fill it with water straight from the hose and leave it for a few days will be great. Once the plants (eg my lettuce) are established I find topping it up once a week is enough, even if it is completely dry for a couple of days. I didn't refill mine when it was hot, just to see what would happen, and everything was fine. The lettuce recovered quickly from chook attack (twice) and I am picking them daily again. The beans are now about 20cm high and have leaves the size of the palm of your hand (unless you are a giant!) - it is amazing.

Monday, 18 February 2008

Do you know what didn't droop today?

Yes, the okra and Tony Scarfo's eggplants didn't droop but can you guess what else? Was it the broccoli? No. Was it Cath's red/ yellow capsicums? No. Give up? It was some of the lettuce ! Which lettuce? The 8 lettuce growing around the terracotta pot experiment. Not 1 leaf looked unhappy all day even though they are in the full sun. 40C and great-looking lettuce, that is something to be all skippity-doo about. This terracotta thing is one way to help tender plants get by. Oh, and those new bean shoots didn't miss a beat either because they are around another terracotta pot.

Why isn't the world cheering and gathering all their terracotta pots together and sealing up all the holes and filling them with water and burying them in the ground with me? Holy valotta, I haven't got a clue but at least the plants are cheering and clapping their little leaves.

Wednesday, 13 February 2008

Wicking Box Gardens

On the weekend I made some wicking box gardens to put some early autumn greens in.
See the full instructions here.

The water is poured into the drainage hose at the top to feed it through to the bottom layer which acts as a reservoir. The rest of the soil in the box is watered by the 'wicking' action whereby water is pulled up through the growing layer.

The compost worms live in the growing layers to keep the soil healthy.
The soil is allowed to dry out between waterings and the drainage hole in the side prevents flooding during rainy weather.

From the Waterright site: (Click here for link)
"The wicking bed is the most important,
it enables us to grow food with a lot less water,
it can be used to harvest water otherwise lost
and particularly it can actually capture
carbon from the atmosphere."

Tuesday, 29 January 2008

Wicking Beds

This photo shows 2 lots of zucchini this morning at 10.30.
The poor old ones on the left are out in the main garden...under 50% shade...in a 'normal' bed. The ones on the right are in a wicking bed under the Almond tree.

Both lots received water on Sat (our watering day). The ones on the left have already needed to have their container (for watering) turned on today (Tuesday)!

Both lots of plants are the same age...although not the same type I will admit.

It's on these hot days (36C+) and still no rain in sight that I'm glad I've experimented with these wicking beds.

Basically the beds are built over a plastic membrane layer at the base, this is raised to form a small pool of underground water, fed by a length of drainage hose, that wicks upwards to where the plant roots can use it.
As the pool dries out oxygen is drawn into the soil and when they are watered again the oxygen is forced out. Make no sense at all??
For full descriptions and photos see my blog entries here:

I'm about to re-build most of these beds to make them deeper for Autumn crops but even these shallow ones are holding water well.
I'm also going to try a box version for growing salad greens as this heat just saps all moisture from the containers.

Saturday, 19 January 2008

TERRACOTTA MEETS TERRA FIRMA


I had this idea when I was at the shack and I am putting it into practise today. You see, terracotta is porous and I always seal my terracotta pots before I put plants in them, so I thought they would be a useful receptacle for storing water and letting it seep slowly into the soil, especially for use with rainwater tanks where I want to encourage people not to install a pump. So I bought a long thin one, about the height of my little dog (about 30cm, the pot not the dog) and I bunged up the hole with a 20c piece (just for fun - it's an investment) glued in with silicone.

I put some water in later and I could see it begin to seep out the sides almost immediately. See the darker colour at the bottom.


Then I dug a hole in the ground - that's when I found the worms - and, eventually, put the pot in it and filled the pot with water.


I filled firmly around the pot with good soil mixed with a handful of wet coir block (excellent for holding water) and laid my dripper line over so it will get water once a week when this dripperline comes on. It is a dryer spot here as it is the end point of the dripper system so it will be interesting to test this plan in such a tough spot.

I then planted some lettuce seedlings all around the pot and watered them in well. I would have put the soil up to the lip of the pot or dug the hole deeper but a) I got down to the rock below and couldn't go any deeper and b) I didn't have any more soil available. Then I put some mulch around, all the while trying to think what I could use for a lid...ah yes "The Collage" (see article below). So off I went...


Of course - some of that packaging foam would be ideal. I cut out a piece with a stanley knife, making a groove for the tube to fit through, put a rock on top and there we go.
Another option is to put water plants in the pots eg water spinach (kang kong) or other edible things that would be happy in such a long thin pot (water chestnuts need something wider). I will do this next.
The idea is to use several of these, linked by a tube to the rain water tank or tap. They will happily fill using gravity alone. You wouldn't have a dripper system to worry about - unlike my set-up - and you wouldn't be using electricity to water your garden. I will see how well they work in the next few weeks. Please leave a comment if you have some fine-tuning or questions.

Friday, 21 December 2007

Rain, Glorious Rain!

The baby's asleep, my step daughter is with her grandmother and my husband's at work. At last I've had a few minutes to myself and they've been wonderful! I've been sitting on my back veranda (with the chooks pecking at my shoelaces) watching the rain and finally getting the time to enjoy my garden.

I took a photo of the triangle veggie patch near my back door and put some labels on it. (You might have to click on the picture to make them big enough to read.) I've been watering this patch every couple of days with the bucket and drippers I got from Bunnings for $30. It's been really good. My tomatoes are doing well on the other side of my garden. The ones in the picture on the right are Rouge de Marmande. (These are the ones I bought in winter at Mitre 10 since they were advertised as "winter tomatoes" but they still waited until summer to fruit.) They have a wonderful flavour and we can't eat them fast enough to keep up with the rate they're growing! I've just started growing them up a wire attached the the veranda roof since I didn't put in a tall enough stake for them.

The cherry tomatoes in my triangle patch (left) were self sown. I didn't water them for a long time and thought they were going to die, but since I've put the dripper stake in with the Bunnings bucket, they've taken off. Not a lot of fruit yet though. I must get around to tidying them up, staking them and cutting out those dead leaves. If only Peter would stay asleep a little longer...